|
We are under two weeks from the start of our straw bale training and build! On Friday October 1st, 650 bales will be arriving on a semi from western Wisconsin in front of our small 1/8 of an acre lot. I have cajoled some friends and volunteers into helping us unload the semi and get the bales stacked and ready for Monday's build start.
Are you interested in getting hands on experience with straw bale construction and helping us with our wall assembly? From October 4 (Monday) through roughly October 10 (Sunday), we will be working with community members, volunteers, and friends to assemble all of our walls and getting on the first coat of plaster. Come join us! We have weekday shifts from 8am-11:30am, 12pm-3pm, and 3pm-6pm. Saturday and Sunday we will be working from 8:30-12:30pm and 1pm-5:30pm. Lunch and snacks provided! We have all the tools you will need (maybe bring your own gloves, if you prefer) and will teach you everything that you need, depending on your interest. Sign up to volunteer here and tell your friends!
0 Comments
Peter here. It has been an exciting few weeks of construction on site. As you saw in our last post, Katie got her hands dirty (or rather, boots) in helping with the foundation pour. Since then, the framing for the first and second floors has gone up! Straw bale framing for our project is a bit different than what you would see in a traditional stick frame. Our posts are 4"x4" and vertical. We don't do the normal cross bracing like in a stick frame because that would make putting in the straw bales an incredible pain in the butt. With just the vertical posts, notching our bales to fit will be much easier. Now you might be thinking to yourself, "But Peter, won't your house topple over without any extra supports?" And you're probably right! The Big Bad Wolf could probably do some damage if we stopped our work there. Our engineers, however, had added in quite a significant amount of "hurricane braces" to ensure that no storm will be knocking this house over. Quick networking shoutout to Tony Poletto and Jeff Anderson at Meyer Borgman Johnson. Tony and Jeff are both accomplished structural engineers who also happen to be my former college ultimate frisbee teammates. Good to be able to work with your friends! I do want to note that there is a tradeoff with the hurricane braces and steel that will be used to reinforce our framing. Part of the goal with the straw bale wall assembly was to use a waste product that can be composted at the end of life. Overall, we were hoping to use less energy. Steel is, unfortunately, very energy intensive to work with and likely undoes some of our carbon gains. We did take some solace, however, that steel is very easy to recycle, where any fossil products that we would have otherwise used for our wall assembly likely wouldn't have been. Back to the framing, you will also notice the pony wall at the base of the first floor. This will be a more "standard" wall and the cavity will be filled with cellulose. This is an extra moisture security measure. Though the plaster should keep our bales dry, we are taking the extra precaution of starting the bales a couple of feet off the ground to make sure that no water gets in, which would be bad for everything. Two nice things about the pony wall, though: we can hide almost all of our electrical wiring for the first floor in this cavity, meaning we can skip some of the bale cutting that we would have otherwise had to do (and we will have to do on the second floor). Second, it provides a great visual for our build blog for how thick our walls will be! Not everyone has a clear mental picture of how thick a two-string straw bale, so this framing makes it easier. In addition to the pony wall, you can see where the window and door framing is taking place. This was another small compromise for us in that we ended up agreeing to use plywood for the framing. We had to find a way to provide enough strength to support the windows to be mounted on the exterior of the framing. We wanted the windows on the outside to again provide extra protection against water pooling anywhere and potentially seeping in. Had the windows been mounted on the inside, where the rest of the beams are, there would have been a sill on the exterior that would have potentially provided an opportunity for water to get in. So, we compromised and used plywood to make sure that our bales are safe and dry. Plus, now we'll have a built in window seat at every window! Trusses should arrive this week so that the roof and balcony work can begin. Less than two weeks until the straw bales arrive! Sign up to volunteer for a shift with us here and learn more about straw bale construction! We'll start setting bales Oct. 4th! For the first three days of that week, straw bale expert, Andrew Morrison, will train our crew in completing a wall and a corner from bale to mesh/sew to plaster. From there, we're aiming to finish the rest by Sunday, the 10th. To do that, we need your help! The straw bale process involves three main steps, which I outline below. You'll also see this in our Google Form to sign up! Step 1. Setting the strawbales - involves cutting bales in order to fit around wooden posts, tying smaller bales to fit them in smaller spaces, and setting bales in the walls in general. (Photo: stuffing the top bale row under the box beam, which is the wooden structure at the top of using thin pieces of smooth plywood to wedge in the bale)  Step 2. Meshing and sewing the walls - means affixing two-inch wire mesh to the exterior of the bales and sewing them into place with twine. (Photo: a couple of teams meshing the far wall and the team on the far right meshing around a window) 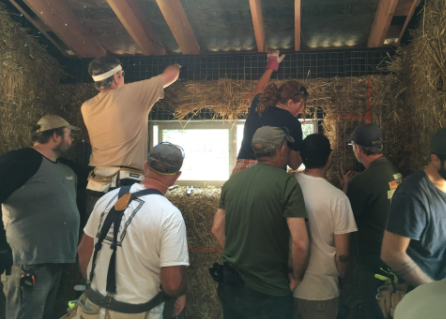 Step 3. Plastering - involves mixing hydraulic lime plaster in a cement-type mixer, putting it on the walls, and smoothing it out. (Photo: applying the "scratch coat" or the first coat to the walls.) 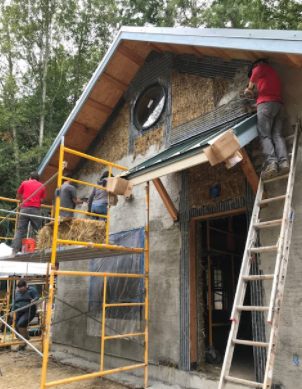 |
AuthorKatie Jones and Peter Schmitt chronicle their building adventure. Archives
January 2024
Categories |
 RSS Feed
